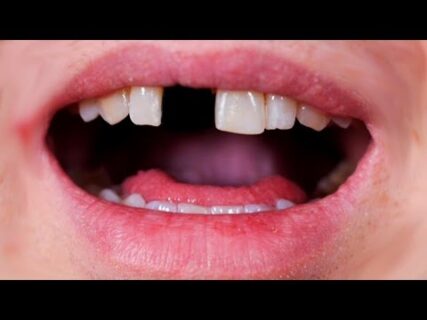
What to Do if Your Tooth Gets Knocked Out
A knocked-out tooth, medically known as an avulsed tooth, is one of the most serious dental emergencies that requires immediate action. Whether it's due to a sports injury, an accident, a fall, or any other traumatic incident, knowing exactly what to do in the critical moments after the injury can significantly increase the chances of saving your tooth. Time is of the essence in these situations, and your quick, informed response can make all the difference between losing the tooth permanently and preserving your natural smile.
Dental avulsion affects thousands of people each year, with sports activities accounting for a significant percentage of these injuries. According to dental statistics, approximately 5 million teeth are knocked out annually in the United States alone, with children and active adults being the most vulnerable groups. The good news is that with proper emergency care, a knocked-out tooth can often be successfully re-implanted and preserved.
This comprehensive guide provides detailed, step-by-step instructions to help you handle this situation effectively, ensuring you give your tooth the best possible chance of being saved. We'll cover everything from immediate first aid to what to expect when you arrive at St. Lucie Dentist for emergency treatment, as well as long-term care considerations to ensure the best possible outcome.
Emergency Time Window
For the best chance of saving your tooth, seek dental care within 30 minutes of the injury. Even if this time has passed, still contact us immediately as there may be options available.
Understanding Tooth Avulsion
Before diving into the emergency steps, it's helpful to understand what happens when a tooth is knocked out. A tooth consists of several parts: the crown (visible part), the root (embedded in the jawbone), and the periodontal ligament (connects the tooth to the bone). When a tooth is knocked out, the blood vessels, nerves, and supporting tissues are damaged. The critical factor for successful re-implantation is the preservation of the periodontal ligament cells on the root surface.
These cells are essential for the tooth to reattach to the bone. If these cells dry out or are damaged, the chances of successful re-implantation decrease significantly. The longer the tooth remains outside the mouth, especially in a dry environment, the more these cells deteriorate. This is why immediate and proper action is crucial.
Research indicates that teeth that are re-implanted within 30 minutes have the highest success rate, often exceeding 90%. After 60 minutes, the success rate drops to approximately 50%, and after two hours, the prognosis becomes much less favorable. This timeline underscores the critical nature of prompt action following a dental avulsion.
Immediate Steps After a Tooth is Knocked Out
The first few minutes after a tooth is knocked out are crucial. The longer the tooth remains outside the socket, the lower the chances of successful re-implantation. Here's what you need to do immediately:
1. Stay Calm and Act Quickly
It's natural to panic when faced with such a situation, especially if there's blood or pain involved. However, staying calm will help you think clearly and act quickly. Take a deep breath, assess the situation, and remember that your quick action can save the tooth. If you're assisting someone else with a knocked-out tooth, help them remain calm as well, especially if it's a child.
2. Retrieve the Tooth Properly
Carefully locate and pick up the tooth by the crown (the part you normally see in your mouth). This is absolutely critical – avoid touching the root at all costs, as this can damage the delicate periodontal ligament cells necessary for re-attachment. The root surface contains thousands of specialized fibers and cells that are essential for the healing process and reattachment to the jawbone.
If the tooth has fallen onto a dirty surface, don't worry about potential contamination at this point – retrieving the tooth quickly is more important. Bacterial contamination can be addressed later during professional dental treatment. The priority is to protect the root surface cells from drying out and physical damage.
3. Assess for Additional Injuries
While focusing on the knocked-out tooth, don't overlook other potential injuries. Check for cuts, bleeding, additional damaged teeth, jaw injuries, or signs of concussion if the incident involved head trauma. In case of severe trauma, especially involving the head, seeking medical attention at an emergency room might take precedence over dental care.
4. Check the Tooth Condition
Quickly examine the tooth to assess its condition. If the tooth is dirty, gently rinse it with water or milk. Hold it by the crown and let the liquid flow over the tooth without scrubbing or wiping the root surface. Never use soap, alcohol, or other cleaning agents, as these substances can destroy the vital cells on the root surface. Also, avoid wrapping the tooth in a tissue or cloth, as this can damage the root cells and cause them to dry out more quickly.
If the tooth is broken as well as knocked out, collect all the pieces. While a fractured tooth presents additional challenges, modern dental techniques may still be able to salvage the situation.
Remember This
Always handle the tooth by the crown (white part), never touch the root. Keep the tooth moist at all times. If possible, try to reinsert it in the socket.
Handling the Tooth Properly
How you handle the tooth is just as important as acting quickly. The cells on the root surface are vital for re-attachment to the bone, so it's essential to protect them throughout the emergency.
1. Avoid Touching the Root
As emphasized earlier, always handle the tooth exclusively by the crown. The root surface is covered with periodontal ligament fibers that are crucial for successful re-implantation. Even gentle contact with these fibers can cause damage that significantly reduces the chances of saving the tooth. Think of these fibers as thousands of tiny anchors that will help secure the tooth back into the socket.
2. Do Not Scrub or Sterilize
The instinct to clean a tooth that has fallen on the ground is natural, but scrubbing the tooth can remove or damage the cells on the root surface. Similarly, attempting to sterilize the tooth with alcohol, hydrogen peroxide, or other antiseptics will kill the vital cells necessary for reattachment. If cleaning is absolutely necessary, a gentle rinse with water or milk is sufficient. Let the liquid flow over the tooth without any rubbing or wiping action.
3. Keep it Moist at All Costs
The tooth must be kept moist at all times to prevent the cells from drying out and dying. Dry cells are dead cells, and once they're gone, the chances of successful re-implantation drop dramatically. Even a few minutes of dryness can significantly impact the prognosis. This is why proper storage of the tooth while en route to the dentist is critical if immediate re-implantation isn't possible.
4. Handle With Clean Hands
If possible, quickly wash your hands before handling the tooth. However, if this would cause a delay, it's better to handle the tooth with unwashed hands than to let it dry out while you clean up. The priority is speed and proper handling of the tooth, with contamination concerns being secondary and addressable during professional treatment.
Rinsing and Re-Implantation Techniques
If possible, the best place for the tooth is back in its socket. Immediate re-implantation offers the highest chance of success as it provides the ideal environment for the periodontal ligament cells. Here's how to attempt re-implantation safely:
1. Rinse Your Mouth
Before attempting to re-implant the tooth, quickly rinse your mouth with warm water to remove any debris or blood clots that might have formed in the socket. Be gentle and avoid disturbing any tissue in the socket area. Do not use mouthwash as the chemicals can be harmful to the healing tissues.
2. Properly Orient the Tooth
Look at the tooth carefully to determine its correct orientation. Examine other similar teeth if necessary to understand how it should be positioned. The flat biting surface should face the opposing tooth, and the curved root should point into the socket. Inserting the tooth incorrectly can damage the socket and complicate professional treatment.
3. Re-Implant Gently
Carefully insert the tooth back into its socket. Apply very gentle pressure, pushing it slowly and carefully into position. If it doesn't easily go back into place with light pressure, don't force it – forcing can cause additional damage to the socket or the tooth. Instead, focus on proper storage and quick dental attention.
Once the tooth is in position, gently bite down on a clean cloth, gauze pad, or moistened tea bag to hold it in place while you make your way to the dentist. This light pressure helps stabilize the tooth without risking further displacement.
If Re-Implantation Isn’t Possible:
Many people are uncomfortable attempting to re-implant a tooth, or circumstances may make it difficult. If you can't re-implant the tooth, proper storage is crucial. Keep it moist by placing it in one of the following, in order of preference:
1. Specialized Tooth Preservation Products
The ideal storage medium would be a specialized tooth preservation product such as Save-A-Tooth or EMT Toothsaver. These products are specifically designed to preserve knocked-out teeth and can maintain the viability of the periodontal ligament cells for several hours. If you participate in contact sports or have children who do, keeping one of these products in your first aid kit is highly recommended.
2. Cold Milk
Milk is an excellent storage medium because it has a pH and osmolality (concentration of dissolved particles) that's compatible with cell survival. It also contains proteins and carbohydrates that cells need to maintain metabolism. Cold milk is preferable to room-temperature milk as the lower temperature slows down cell deterioration. Whole milk is slightly better than skim milk due to its fat content, which provides additional nutrients to the cells.
3. Saline Solution
If you have sterile saline solution (such as contact lens solution), this is also a good option. The salt concentration is compatible with cell survival and can preserve the tooth effectively for up to several hours. Avoid solutions with preservatives or additives if possible.
4. Saliva
If none of the above options are available, you can keep the tooth in your mouth, tucked between your cheek and gums. Your own saliva contains proteins and enzymes that can help keep the cells alive. However, this method should only be used as a last resort, and extreme caution must be taken not to swallow the tooth. This method is not recommended for young children, individuals who are unconscious, or those at risk of swallowing the tooth.
5. Water as a Last Resort
If absolutely no other option is available, water can be used. However, plain water is hypotonic (has fewer dissolved particles than cells) and can cause the periodontal ligament cells to rupture and die. If you must use water, add a pinch of salt to make it more compatible with cell preservation. Even with this modification, water is far from ideal and should only be used when nothing else is available and only for the briefest possible time.
Never Use These Options:
Never store a knocked-out tooth in alcohol, mouthwash, hydrogen peroxide, or hot water, as these will kill the cells on the root surface. Also avoid wrapping the tooth in tissue, paper towels, or cloth as these will cause the tooth to dry out quickly.
When to Seek Emergency Dental Care
Even if you successfully re-implant the tooth, it's crucial to seek emergency dental care as soon as possible. A dentist needs to evaluate the tooth and ensure it's properly stabilized. Ideally, you should see a dentist within 30 minutes of the injury, but even if more time has passed, don't assume it's too late – seek care regardless.
Signs That Require Immediate Dental Attention:
- Severe Pain: If you’re experiencing severe pain that doesn’t subside with over-the-counter pain relievers, this could indicate nerve damage or infection.
- Excessive Bleeding: If the bleeding doesn’t stop after applying pressure for 15-20 minutes, this could suggest damage to blood vessels or surrounding tissues.
- Swelling: If you notice significant swelling in your gums or face, this might indicate infection or inflammation that requires prompt treatment.
- Difficulty Breathing or Swallowing: If you’re having difficulty breathing or swallowing following a dental injury, this could indicate a serious infection or swelling that’s affecting your airway and requires immediate medical attention, possibly at an emergency room.
- Fever: Developing a fever after a dental injury could be a sign of infection that needs immediate treatment.
- Multiple Teeth Affected: If more than one tooth has been damaged or knocked loose, comprehensive emergency dental care is essential.
Calling Ahead
If possible, call St. Lucie Dentist while en route to alert the team of your emergency. This allows the dental staff to prepare for your arrival and minimize any waiting time. Be sure to mention that you have a knocked-out tooth, as this information will help the dental team prioritize your case as an urgent emergency.
What to Expect at St. Lucie Dentist
When you arrive at St. Lucie Dentist with a knocked-out tooth, our experienced team will spring into action to provide the emergency care you need. Here's what you can expect during your emergency visit:
1. Comprehensive Evaluation
The dentist will carefully examine the tooth, the socket, and the surrounding tissues to assess the extent of the damage. This includes checking for fractures in the tooth or socket wall, damage to surrounding teeth, and the condition of the gums and jawbone. The dentist will also evaluate the viability of the periodontal ligament based on how the tooth was handled and stored.
2. Detailed Imaging
Digital X-rays will be taken to assess the extent of the damage beneath the gum line and check for any fractures in the tooth or jawbone that aren't visible to the naked eye. These images provide crucial information that guides the treatment plan and helps predict the long-term prognosis for the tooth.
3. Professional Re-Implantation
If you haven't already re-implanted the tooth, or if the position needs adjustment, the dentist will carefully clean the socket and insert the tooth into its proper position. Before re-implantation, the socket will be gently cleaned of any blood clots or debris that might prevent proper positioning.
4. Stabilization with Splinting
The re-implanted tooth will need to be stabilized to allow for healing. This is typically done by splinting the tooth to the adjacent teeth. The splint is usually a thin, flexible wire or fiber-reinforced composite material that's bonded to the affected tooth and the neighboring teeth. This stabilization is crucial for allowing the periodontal ligament to heal and for preventing the tooth from moving during the critical early healing period.
The splint is typically left in place for 7-14 days for teeth with healthy roots, though more severe cases might require longer splinting periods. Your dentist will determine the appropriate duration based on your specific situation.
5. Antibiotic Therapy
To prevent infection, which can complicate healing and potentially lead to the loss of the re-implanted tooth, your dentist may prescribe antibiotics. Following the antibiotic regimen exactly as prescribed is essential for protecting the healing tooth and surrounding tissues.
6. Root Canal Assessment
In many cases of tooth avulsion, especially in fully developed adult teeth, the blood supply to the tooth pulp is severed when the tooth is knocked out. Without blood supply, the pulp tissue dies, which can lead to infection and abscess if not addressed. For this reason, root canal treatment is often necessary for knocked-out permanent teeth.
If root canal treatment is needed, it's typically performed 7-10 days after re-implantation. In some cases, especially with young permanent teeth that have incompletely formed roots, the dentist might monitor the tooth for potential pulp revascularization (regrowth of blood vessels) before deciding on root canal treatment.
7. Tetanus Prophylaxis
Depending on your immunization history and the circumstances of the injury, the dentist may recommend a tetanus booster shot if you haven't had one in the last five years, especially if the tooth was contaminated with soil or dirty substances.
8. Pain Management
The dentist will recommend appropriate pain management strategies, which may include over-the-counter pain relievers or prescription medications depending on the severity of the injury and your individual needs.
9. Detailed Home Care Instructions
Before you leave the office, you'll receive comprehensive instructions for caring for the re-implanted tooth at home. This will include dietary restrictions, oral hygiene practices, medication schedules, and signs of complications to watch for.
Long-Term Care and Prevention
After the initial emergency treatment, long-term care is essential to ensure the tooth remains healthy and stable. The healing process for a re-implanted tooth can take several months to a year, and diligent follow-up care significantly improves the chances of long-term success.
Follow-Up Appointments
Regular follow-up appointments are crucial for monitoring the healing process and addressing any complications promptly. Typically, you'll need to return for check-ups at specific intervals:
- After 1-2 weeks for splint removal (unless a longer splinting period is needed)
- After 3-4 weeks to check initial healing
- After 6-8 weeks to evaluate root canal treatment if performed
- After 3, 6, and 12 months to monitor long-term healing
- Annual check-ups for at least 5 years to ensure continued health of the tooth
These appointments allow your dentist to track the healing process, check for signs of root resorption (breakdown of the root structure), monitor for infection, and ensure the tooth remains properly positioned and functional.
Maintaining Good Oral Hygiene
Excellent oral hygiene is essential after tooth re-implantation. However, you'll need to be particularly gentle around the affected area, especially during the early healing phase:
- Brush gently with a soft-bristled toothbrush twice daily
- Use a prescription antimicrobial mouth rinse as directed by your dentist
- Once the initial healing has occurred, carefully resume flossing, using extra caution around the re-implanted tooth
- Avoid tobacco products, which can significantly impair healing
Dietary Considerations
For the first few weeks after re-implantation, follow a soft diet to avoid putting too much pressure on the tooth. Foods to focus on include:
- Smoothies and protein shakes
- Yogurt, cottage cheese, and other soft dairy products
- Well-cooked pasta and rice
- Steamed or boiled vegetables
- Scrambled eggs
- Soups and broths
Avoid hard, crunchy, sticky, or chewy foods that could dislodge the healing tooth. Also, be cautious with extremely hot or cold foods, as the treated tooth may be more sensitive to temperature changes.
Preventing Future Dental Injuries
Once you've experienced a knocked-out tooth, taking preventive measures becomes even more important:
Custom Mouthguards
If you participate in sports or recreational activities with a risk of facial injury, wearing a mouthguard is essential. Custom-fitted mouthguards provided by your dentist offer superior protection compared to over-the-counter options. They're precisely molded to your teeth, providing maximum protection and comfort. At St. Lucie Dentist, we can create a custom mouthguard specifically designed for your unique dental structure.
Addressing Predisposing Factors
Some dental conditions can increase the risk of tooth avulsion. These include:
- Protruding front teeth: Orthodontic treatment to align prominent front teeth can reduce their vulnerability to injury.
- Teeth grinding or clenching: A nightguard can protect teeth from excessive forces